My Introduction to Proxmox
I've been thinking about it for a while. What really kicked it off was a friend, wanting to move his Home Assistant (docker), to a real Home Assistant Operating System installation. I told him, no worries, but lets make it even better. What we ended up doing was installing Proxmox on a machine he had ready to install Home Assistant onto. Prior to today, I hadn't used Proxmox before. I of course have used VMware ESXi before, and I knew it was very similar.
On his install, it was very simple. Install Home Assistant OS and a Ubuntu server box to use as a docker host. My install, well, I'm not sure I have much use for it other than replacing my Intel NUC devices that run my Home Assistant OS and docker services. What I do know though, is I want to fuck around and find out.
My Use-Cases - Rapid Prototyping
IPsec Tunnel
I quickly found myself using the VM host to quickly spin up Ubuntu hosts to rapidly prototype configuration ideas and testing. My first try and figure out the best way to setup a VPN tunnel back to my Mum's house. Now, ordinarily that wouldn't be an issue because you just setup a standard IPsec VPN, however it gets a bit trickier when you have to work around a dynamically assigned public IP address, which my mum has.
Working Around Dynamic IPs
My first idea was to attempt to use the built in VPN 'teleport' feature of my Unifi network here at home. However, after installing and troubleshooting getting a self-hosted Unifi network application working on a VM, it turns out it doesn't give you the option to do the teleport feature, because you need to adopt a gateway device. Well, after looking up the cost of a Unifi Security Gateway, I continued on further research.
I had known you can use a service like dynamicdns.com however, I guess out of stubbornness, it was not in my best interest to go with a public and free service. I wanted something more private, especially considering I am literally hosting a site-to-site VPN. In my research, I found that you can dynamically update CloudFlare record's via their API, which meant I can update IPs as required, however this must be done through a custom script.
Actually, it hadn't occurred to me until writing this article that there's likely already a script written by someone else that I could use. However, I will strive on and create my own! Plus, it's more fun!
As per CloudFlare's recommendation, before writing my script, I knew a requirement would be to interface with the CloudFlare API. Unfortunately, while thoroughly documented, it's not exactly clear. I eventually figured out the correct URL.
https://api.cloudflare.com/client/v4/zones/{zone_identifier}/dns_records/{identifier}The {zone_identifier} was pretty easy to figure out, as it was just plainly on the dashboard of my CloudFlare domain page. However, figuring out what the {identifier} ended up being more difficult than it was aught to be. I eventually found out that each record on your domain has it's own identifier, which you can only get through an API call. Once I found this, I quite easily made this request work.
Creating The Script
Behind every good script, is a good plan. Below is my plan for my script.
Script goal: Check for public IP change and call API update to CloudFlare if change is detected.

How:
1. Every 15 minutes: get the current public IP
2. Check if 'currentip' is stored, if not create file and store IP inside.
3. Cross-reference retrieved IP and IP stored in file, if different, continue.
4. Prepare API call with updating required variables (date-time and new IP).
5. Send a PUT request to CloudFlare's API.
6. Await success or error. Alert if error occurred.

Optional: make this into a docker container, where API keys & other requirements to API call is stored in environment variables. Publish to GitHub.
To be continued... (currently yet to build)
Adding a subnet to my network
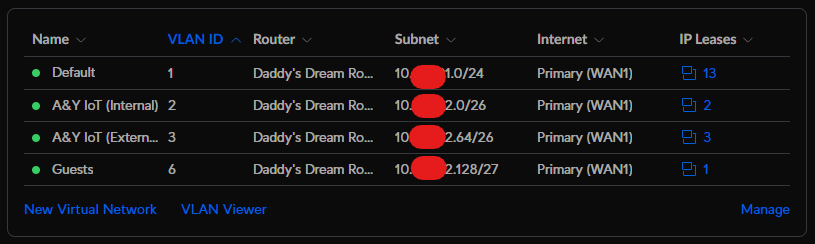
I encourage you to read my Subnetting My Own Network article, essentially I've already done this, but I haven't had my service devices (servers of various kinds) on a different subnet than my main subnet which also contains my trusted client devices (PC's, phones, etc). I haven't really had an issue with having all these on the same subnet, though now that I've got a proper virtual host, (instead of just a docker host, where everything has been 1 IP, just different ports) I've decided to make a new subnet.
I've got a couple of options here, I can add a /27 network to the end of my current network stack, or I can split my default network (/24) in half and have two /23 networks. To choose the correct option for me, it'll be based on requirements, inwhich I cannot see my self needing any more than 29 hosts for this 'Services' network, so I will be simply adding a /27 to my network. See below my current setup.
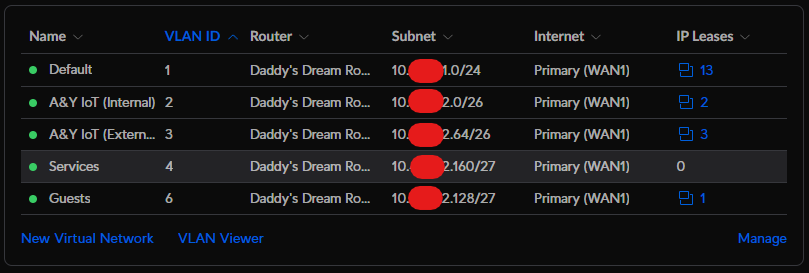
As I went to add my new network of 10.xxx.x2.160/27, I was humbled to be notified that my VPN connection range I've already assigned to 10.xxx.x2.160/28.
I've now updated my VPN client range to 10.xxx.x2.191/28, and since it is necessary to have the VPN clients to have particular IP address, it wasn't an issue to move these. After modifying that /28 network, I have created the new /27 network I originally wanted. See my new network setup below.
Changing the Proxmox IP
Now that I've got this subnet, I will put the Proxmox host onto it. I will need to be careful about this though, as if I change the subnet on the associated router port and the static IP address hasn't been changed yet to the new subnet on the Proxmox device, I will lose access entirely.
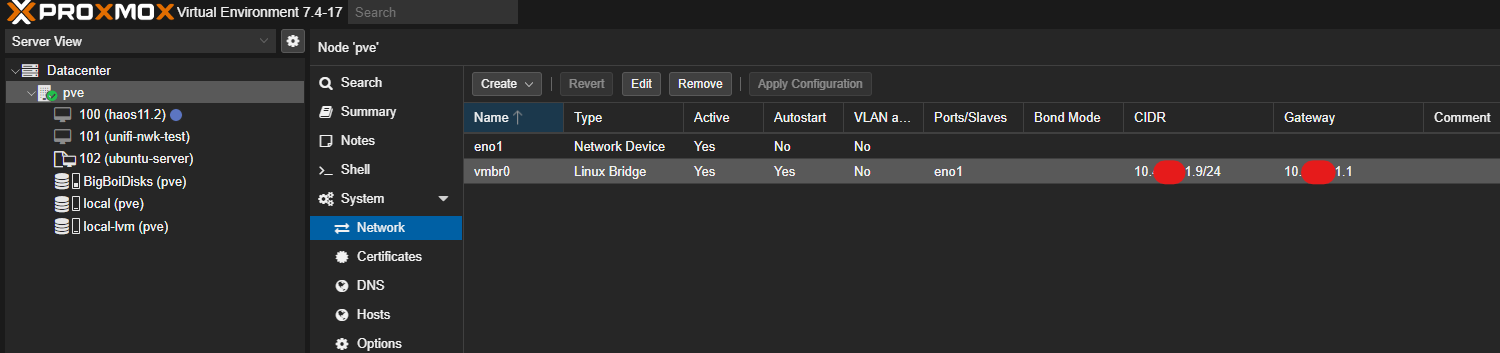
- Firstly, changing the IP on the Proxmox host itself first.
| Original Configuration |
 |
| New Configuration |
 |
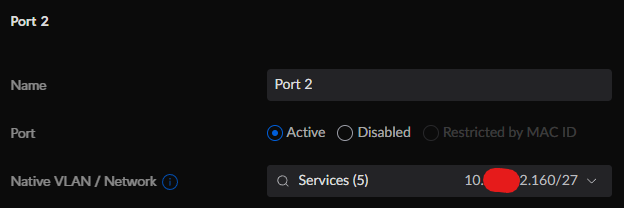
2. Then changing the network port VLAN the Proxmox host is connected to.
After a quick restart of the Proxmox host, the IP was successfully changed.
Update - 2024-02-25
I have purchased a Mellanox ConnectX-4, paired with a 10 gigabit LC-LC fibre transceiver. I initially had this installed into my desktop PC, but now I've moved it to my Proxmox host. This was done to allow the Proxmox host to access my NAS at higher speeds as most of my virtual machines have their hard drives located on the NAS.